顯示具有 nodejs 標籤的文章。 顯示所有文章

2017年2月8日 星期三

[nodejs] electron + drivelist + webpack 的小問題

為了要在 windows 系統列出磁碟機代號,用了 drivelist 這個套件,它是解譯系統指令的輸出來得到磁碟代號。

在沒有與 webpack 整合是沒問題,但是合在一起就出問題。

環境:electron, webpack, drivelist

第一個是解譯 json 的問題

當程式一引入 drivelist 就產生以下錯誤:

ERROR in ./~/drivelist/package.json
Module parse failed: C:\electron_project\electron\node_modules\drivel
ist\package.json Unexpected token (2:9)
You may need an appropriate loader to handle this file type.

因為它的 scripts.js 用到一句:

const debug = require('debug')(require('../package.json').name);

這個還好解決,首先是安裝 json-loader 使用指令 npm install --save-dev json-loader 然後在 webpack.config.jsloaders 裡加一個 { test: /\.json$/, loader: 'json-loader' } 這樣就解決了。不用改到程式。

第二個是執行路徑的問題

雖然解決了引入的問題,接下來要查詢的時候出現以下錯誤:

Uncaught Error: spawn \scripts\win32.bat ENOENT

原因是的 scripts.js 設定執行路徑是這樣做的:

const SCRIPTS_PATH = path.join(__dirname, '..', 'scripts');

在經過 webpack 打包之後, __dirname 在這裡已經變成根目錄 “/”,所以底下執行就找不到執行命令。另外,scripts 也沒有複製到目標目錄去。所以要改 webpack.config.jsscripts.js

webpack.config.jsplugins 底下的 CopyWebpackPlugin 裡面加一個 { from: path.resolve(node_modules_path, 'drivelist/scripts'), to: 'scripts' }

webpack.config.jsplugins 裡面加一個

new webpack.DefinePlugin({$dirname: '__dirname'})

這個 $dirname 就會是 main.js 執行的路徑,也就是原先 __dirname 的值。然後就要改 scripts.js 的程式碼,把 SCRIPTS_PATH 改成為:

const SCRIPTS_PATH = path.join($dirname, 'scripts')

改完之後,就可以由 electron 執行了。

註:這樣改法,node_modules 裡面的 drivelist 因為路徑關係,就沒辦法用命令列來執行了。

2017年1月18日 星期三

[nodejs]打造自己的開發環境閱讀心得

前言

因為有點不知道除了 visual studio 之外的開發環境會長怎樣,所以研究了一下以下的文章,稍微了解一下現在的世界長怎樣了。 http://larry850806.github.io/2016/09/04/es7-environment/

我這篇算是心得報告,只有把我不會的地方加一些描述。要了解全部還請記得去原來的地方看。記得一定要感謝原作者 Larry Lu http://larry850806.github.io/about/
https://github.com/Larry850806/nodejs-ES7-template

了解生字

  • babel
    它看來是一個編譯器,把你寫的 javascript 轉成另一種寫法的 javascript。這大概就是目前 javascript 最有趣的地方吧…。 https://babeljs.io/
    類似的有:TypeScript, CoffeeScript

  • gulp
    這個看起來像是 gcc make 的系統,依照你寫的設定標,自動把編譯、複製、散佈等工作做完的系統。是 node.js 的套件之一。
    http://gulpjs.com/ http://abgne.tw/web/gulp/gulp-tuts-install-gulp-js.html

目錄安排

文章中的建議是因為有用了 gulp 做自動處理,所以會把檔案很乖地很分散在各個不同的目錄裡。

package.json
node_modules
gulpfile.js
index.js
src
    index.js
    utils.js
build
    index.js
    utils.js

package.json 與 node_modules 是 node.js 需要的。
gulpfile.js 是 gulp 的設定
最外面的 index.js 是程式執行的起點。但它只是轉一手讓 build/index.js 來執行。為了不要讓人太傷腦筋。
src 裡,原文是放 ES7 的程式,build 是被轉成 ES5 的程式。

註:ES7 與 ES5 是指 ECMA Script 7 與 ECMA Script 5。是 Javasript 目前的正式學名。兩個在語法上有不同,所以必須要分兩個名字來講。目前可以靠程式把新語法轉成舊語法,以利舊瀏覽器/舊環境執行,減少大家開發上轉換的痛苦。這一點也是獨特之處。

開發流程

開發時只動 src 裡的東西,其他的動作靠 gulp 來幫忙。
真正執行的起點是 ./index.js,而它會去執行 build/index.js。

gulp 設定

因為是靠 gulp 來處理轉譯與搬檔案,所以要了解一下它的用法。https://github.com/nimojs/gulp-book

文章內使用的設定是:

// gulpfile.js

var gulp = require('gulp');
var babel = require('gulp-babel');

gulp.task('babelify', function(){
    return gulp.src('src/**/*.js')
        .pipe(babel({
            presets: ['es2015', 'es2016', 'es2017'],
            plugins: [
                [
                    "transform-runtime", {
                        "polyfill": false,
                        "regenerator": true
                    }
                ]
            ]
        }))
        .pipe(gulp.dest(build))
});

使用方法是在命令列輸入 gulp babelify,gulp 就會把 src 裡所有的 js 用 babel 轉成 ES5 的程式碼,丟到 build 裡去。所需要的模組是:

{
    "babel-plugin-transform-runtime": "^6.12.0",
    "babel-preset-es2015": "^6.13.2",
    "babel-preset-es2016": "^6.11.3",
    "babel-preset-es2017": "^6.14.0",
    "gulp-babel": "^6.1.2"
}

babel 轉譯錯誤的輸出

若是在 babel 轉譯的時候有錯誤,要把錯誤寫出來,需要在 .pipe(babel({…}) 後面加上 on error 的處理函式

.on('error', function(err){
    console.log(err.stack);
    this.emit('end');
})

debug 用的 source map

在轉譯之後,有 exception 發生時,會 dump 出來的是已轉譯的程式碼(也就是 build/index.js),但是那個我們人類很難看,所以可借用所謂的 source map 來讓錯誤對應到 src/index.js 我們比較好修正。(本來設計也只能在 src 那裡動程式碼。)所以在 on(‘error’, … )的後面加上:

.pipe(sourcemaps.write({
            includeContent: false,
            sourceRoot: 'src'
}))

要讓 node 知道要採用 source map 來對應錯誤行號與內容,要在執行的 index.js 加上:

require('source-map-support').install();

要做到如此,source map 需要兩個模組:

{
    "gulp-sourcemaps": "^1.6.0",
    "source-map-support": "^0.4.2"
}

程式碼變動自動轉譯

這個功能原作者是用 gulp 來監視檔案有無變動,有的話就自動轉譯。要在 gulpfile.js 加上一段:

gulp.task('watch', function(){
    return gulp.watch(['src/**/*.js'], ['babelify']);
});

gulp.task('default', ['babelify', 'watch']);

最後

還可以多看一篇 http://larry850806.github.io/2016/07/25/react-optimization/ 這裡大概就可以知道為什麼 python 會有 mutable、immutable 的東西跑出來。

2016年8月8日 星期一

[超譯]Node.js 加 MQTT 入門

https://blog.risingstack.com/getting-started-with-nodejs-and-mqtt/

Node.js 加 MQTT 入門

這篇貼文由 Charlie Key 提供,他是 Structure 的 CEO 與 Co-Founder。Structure 是一個 IoT 的平台,讓你能輕鬆建立相連的經驗與解決方案。Charlie 已經用 Node.js 於工作幾年,現在用它來為 IoT 的世界充能。
Javascript 的世界持續地開發新彊界,像 Node.js 的技術可讓伺服端快速擴展,而現在達到 IoT 的世界。Node.js 現在可在許多嵌入式裝置內,像是 Intel Edison。與嵌入式裝置的溝通一向都可行的,但使用 Node.js 與 MQTT 這類協定讓溝通前所未有的簡單。
在這貼文,我們會看一下如何利用兩個技術(Node.js 與 MQTT)來傳送訊息,建立一個簡易的車庫開門應用程式。這只是此類通訊的其中的一個可能的應用。
MQTT 本身是個非常簡單的 publish / subscribe (出版/訂閱)協定。它讓你在一個主題上送訊息(你可以想像那些是頻道),經由一個中央管理的 message broker。整個協定故意非常輕量。這會讓它能輕易地在嵌入式裝置上執行。幾乎所有的微處理器都有函式庫可用讓它能收送 MQTT 的訊息。以下可以看到 MQTT 溝通的基本概念。

這裡一張架構圖
現在,想像一下我們要打造一個遠端控制的車庫開門系統,使用 MQTT。第一件事我們需要計畫車庫門與遠端遙控器要傳送什麼訊息。為了要讓這範例簡單,我們只打算能夠開門與關門就好。真實的架構圖會長成這樣:
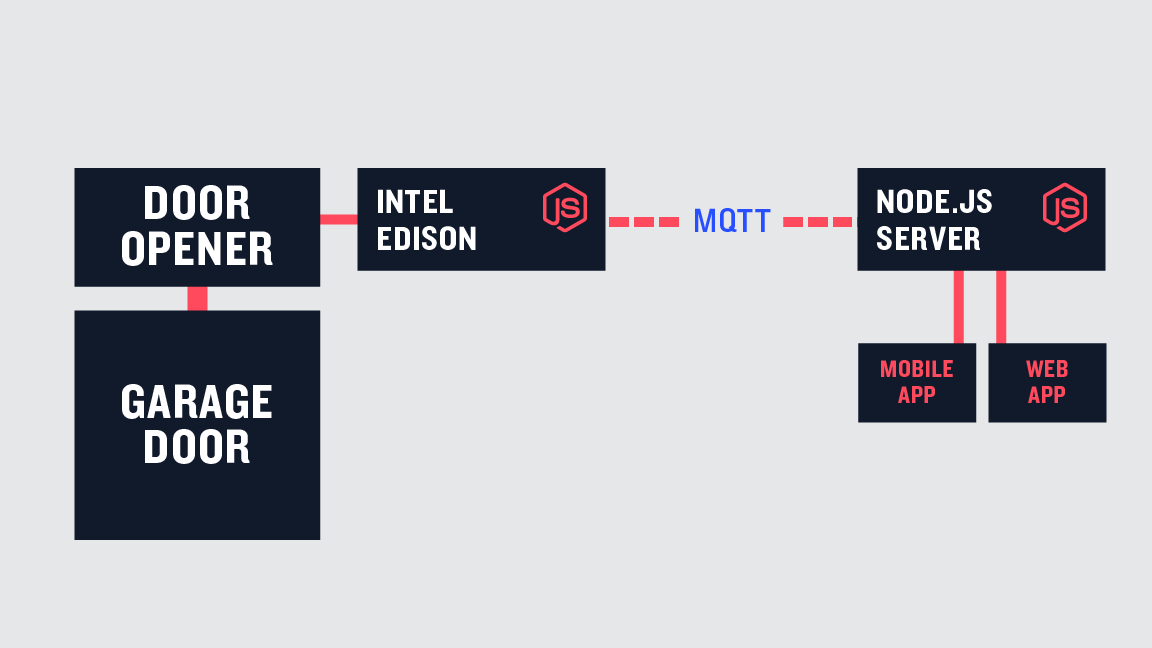
又一張架構圖
門會有幾個狀態,已開、已關、開門中、關門中。真的門也許會有其他狀態,如 暫停。但我們今天暫不考慮。
我們的應用程式會分開兩個檔案,一個是給車庫用另一個給控制器用。我會在每個程式的上頭標名檔名。首先,我們會需要用 npm 安裝 mqtt 函式庫,然後設定我們要用的 broker。現在有很多開放的 broker 可用於測試,我會使用 broker.hivemq.com。再次強調,這只是測試用,不要在正式產品還用這個。以下是兩個檔案一開始都要的程式碼:
// contoller.js and garage.js
const mqtt = require('mqtt')  
const client = mqtt.connect('mqtt://broker.hivemq.com') 
接下來,我們要加一些程式碼來連上 broker。一定連上,我們會建立一個主題(頻道),這在車庫門連上時的溝通用的。在門這邊,是 publish(出版)訊息到這個主題,而控制器這邊則是subscribe(訂閱)。同樣,在這個時間點,我們會加一個區域變數,追蹤車庫門現在的狀態。你會發現我們的主題加了前綴 “garage/”,這是為了組織目的的簡化,你也可以隨自己喜歡來命名。
// garage.js
const mqtt = require('mqtt')  
const client = mqtt.connect('mqtt://broker.hivemq.com')

/**
* The state of the garage, defaults to closed
* Possible states : closed, opening, open, closing
*/

var state = 'closed'

client.on('connect', () => {  
  // Inform controllers that garage is connected
  client.publish('garage/connected', 'true')
})
在控制器端,我們不只是要訂閱這主題,我們也需要加上訊息接聽者,對訊息出版時採取動作。一但訊息收到,我們會使用一個變數,檢查變數的值且追蹤是否門還連在系統上。
// controller.js
const mqtt = require('mqtt')  
const client = mqtt.connect('mqtt://broker.hivemq.com')

var garageState = ''  
var connected = false

client.on('connect', () => {  
  client.subscribe('garage/connected')
})

client.on('message', (topic, message) => {  
  if(topic === 'garage/connected') {
    connected = (message.toString() === 'true');
  }
})
目前為止,門與控制器只知道,門是否連在系統上,我們還不能採取什麼動作。為了要讓控憲器知道門發生什麼事,我們再加上一個函式,送出現在門的狀態,函式長這樣:
// added to end of garage.js
function sendStateUpdate () {  
  console.log('sending state %s', state)
  client.publish('garage/state', state)
}
要使用這個函式,我們會加在車庫連上的呼叫裡:
// updated garage.js connect
client.on('connect', () => {  
  // Inform controllers that garage is connected
  client.publish('garage/connected', 'true')
  sendStateUpdate()
})
現在車庫門可以更新,告訴每個人它現在的狀態。現在控制器需要更新自己的門狀態的變數。然而在這個時間點,先更新訊息處理函式,對應不同的主題呼叫不同的函式。這會增加一點程式的結構性。整個更新完如下:
// updated controller.js
const mqtt = require('mqtt')  
const client = mqtt.connect('mqtt://broker.hivemq.com')

var garageState = ''  
var connected = false

client.on('connect', () => {  
  client.subscribe('garage/connected')
  client.subscribe('garage/state')
})

client.on('message', (topic, message) => {  
  switch (topic) {
    case 'garage/connected':
      return handleGarageConnected(message)
    case 'garage/state':
      return handleGarageState(message)
  }
  console.log('No handler for topic %s', topic)
})

function handleGarageConnected (message) {  
  console.log('garage connected status %s', message)
  connected = (message.toString() === 'true')
}

function handleGarageState (message) {  
  garageState = message
  console.log('garage state update to %s', message)
}
在這裡,我們的控制器可以跟上車庫門的狀態與連線狀態。現在可以加一些功能來控制我們的門。第一件事是讓車庫開始接聽一些訊息,告訴它開或關。
// updated garage.js connect call
client.on('connect', () => {  
  client.subscribe('garage/open')
  client.subscribe('garage/close')

  // Inform controllers that garage is connected
  client.publish('garage/connected', 'true')
  sendStateUpdate()
})
我們現在需要在車庫門這裡加個訊息接聽者:
// added to garage.js
client.on('message', (topic, message) => {  
  console.log('received message %s %s', topic, message)
})
在控制器這裡,我們也會加上傳送開門或關門訊息的能力。這有兩個簡單的函式。在一個真實的應用程式中,這會由外部輸入來呼叫(像是 web 應用程式,手機 app…等)。在這個範例中,我們會用個計時器來呼叫,只是測試這個系統而已。新增的程式碼如下:
// added to controller.js
function openGarageDoor () {  
  // can only open door if we're connected to mqtt and door isn't already open
  if (connected && garageState !== 'open') {
    // Ask the door to open
    client.publish('garage/open', 'true')
  }
}

function closeGarageDoor () {  
  // can only close door if we're connected to mqtt and door isn't already closed
  if (connected && garageState !== 'closed') {
    // Ask the door to close
    client.publish('garage/close', 'true')
  }
}

//--- For Demo Purposes Only ----//

// simulate opening garage door
setTimeout(() => {  
  console.log('open door')
  openGarageDoor()
}, 5000)

// simulate closing garage door
setTimeout(() => {  
  console.log('close door')
  closeGarageDoor()
}, 20000)
以上的程式碼包含開與關的功能。它們確認車庫已經連上系統而且不在已要求的狀態中。我們的控制器最後版本的程式碼如下:
// controller.js
const mqtt = require('mqtt')  
const client = mqtt.connect('mqtt://broker.hivemq.com')

var garageState = ''  
var connected = false

client.on('connect', () => {  
  client.subscribe('garage/connected')
  client.subscribe('garage/state')
})

client.on('message', (topic, message) => {  
  switch (topic) {
    case 'garage/connected':
      return handleGarageConnected(message)
    case 'garage/state':
      return handleGarageState(message)
  }
  console.log('No handler for topic %s', topic)
})

function handleGarageConnected (message) {  
  console.log('garage connected status %s', message)
  connected = (message.toString() === 'true')
}

function handleGarageState (message) {  
  garageState = message
  console.log('garage state update to %s', message)
}

function openGarageDoor () {  
  // can only open door if we're connected to mqtt and door isn't already open
  if (connected && garageState !== 'open') {
    // Ask the door to open
    client.publish('garage/open', 'true')
  }
}

function closeGarageDoor () {  
  // can only close door if we're connected to mqtt and door isn't already closed
  if (connected && garageState !== 'closed') {
    // Ask the door to close
    client.publish('garage/close', 'true')
  }
}

// --- For Demo Purposes Only ----//

// simulate opening garage door
setTimeout(() => {  
  console.log('open door')
  openGarageDoor()
}, 5000)

// simulate closing garage door
setTimeout(() => {  
  console.log('close door')
  closeGarageDoor()
}, 20000)
現在,車庫門必須對應這些訊息做反應。再一次,我們使用 switch 引導不同的主題。一但訊息被收到,門會試著處理它且確認它能到那狀態才動作。然後它會進入轉移狀態(開門中、關門中),送出更新訊息,最後到達持續狀態(已開、已關)。為了測試的目的,最後一個部份是用計時器來完成。在真實情況中,系統應該等待硬體訊號通知它已完成。
// updated garage.js message handler
client.on('message', (topic, message) => {  
  console.log('received message %s %s', topic, message)
  switch (topic) {
    case 'garage/open':
      return handleOpenRequest(message)
    case 'garage/close':
      return handleCloseRequest(message)
  }
})
開門與關門的處理函式可以加到檔案的最後。
// added to garage.js
function handleOpenRequest (message) {  
  if (state !== 'open' && state !== 'opening') {
    console.log('opening garage door')
    state = 'opening'
    sendStateUpdate()

    // simulate door open after 5 seconds (would be listening to hardware)
    setTimeout(() => {
      state = 'open'
      sendStateUpdate()
    }, 5000)
  }
}

function handleCloseRequest (message) {  
  if (state !== 'closed' && state !== 'closing') {
    state = 'closing'
    sendStateUpdate()

    // simulate door closed after 5 seconds (would be listening to hardware)
    setTimeout(() => {
      state = 'closed'
      sendStateUpdate()
    }, 5000)
  }
}
有了這些函式,我們現在有個完整功能的車庫系統。為了測試你可以開啟控制器程式然後再開車庫門程式。控制器會在開啟後 5 秒送開門指令,20 秒送關門指令。
最後我要建議的事是讓我們的車庫門更新自己的連線狀態,當我們的程式因為任何原因被關掉的時候。這個離開的乾淨程式碼是依照 stackoverflow answer 建議,然後改用 mqtt 訊息傳送。這可在放在車庫檔案的最後。所有的東西組合起來就得到最後的車庫檔案。
// garage.js
const mqtt = require('mqtt')  
const client = mqtt.connect('mqtt://broker.hivemq.com')

/**
 * The state of the garage, defaults to closed
 * Possible states : closed, opening, open, closing
 */
var state = 'closed'

client.on('connect', () => {  
  client.subscribe('garage/open')
  client.subscribe('garage/close')

  // Inform controllers that garage is connected
  client.publish('garage/connected', 'true')
  sendStateUpdate()
})

client.on('message', (topic, message) => {  
  console.log('received message %s %s', topic, message)
  switch (topic) {
    case 'garage/open':
      return handleOpenRequest(message)
    case 'garage/close':
      return handleCloseRequest(message)
  }
})

function sendStateUpdate () {  
  console.log('sending state %s', state)
  client.publish('garage/state', state)
}

function handleOpenRequest (message) {  
  if (state !== 'open' && state !== 'opening') {
    console.log('opening garage door')
    state = 'opening'
    sendStateUpdate()

    // simulate door open after 5 seconds (would be listening to hardware)
    setTimeout(() => {
      state = 'open'
      sendStateUpdate()
    }, 5000)
  }
}

function handleCloseRequest (message) {  
  if (state !== 'closed' && state !== 'closing') {
    state = 'closing'
    sendStateUpdate()

    // simulate door closed after 5 seconds (would be listening to hardware)
    setTimeout(() => {
      state = 'closed'
      sendStateUpdate()
    }, 5000)
  }
}

/**
 * Want to notify controller that garage is disconnected before shutting down
 */
function handleAppExit (options, err) {  
  if (err) {
    console.log(err.stack)
  }

  if (options.cleanup) {
    client.publish('garage/connected', 'false')
  }

  if (options.exit) {
    process.exit()
  }
}

/**
 * Handle the different ways an application can shutdown
 */
process.on('exit', handleAppExit.bind(null, {  
  cleanup: true
}))
process.on('SIGINT', handleAppExit.bind(null, {  
  exit: true
}))
process.on('uncaughtException', handleAppExit.bind(null, {  
  exit: true
}))
這了那些,我們完成了我們的車庫門控制器。我希望你能挑戰下一級。一些修改與一個 Intel Edison 會讓你建立一個完整的遠端車庫開門系統。此範例完整的原始碼也會放在 Github。
這只是一個開始。還有一些 MQTT 的新選項與能力,包含使用 SSL、使用者/密碼 認證來增加安全性。
如果你喜歡這篇貼文且想知道 Node.js 能到什麼程度,這有個超讚會議會來到:Node Community Convention。將會有許多偉大的演講,主題包含 IoT、系統放大……等等。

作者
Gabor Nagy
在 Marketing 是個全端。在 web 開發正在從零到英雄的路上。

2013年6月4日 星期二

[nodejs]在 windows 安裝 git-server 有奇怪事件發生(已解決)

https://github.com/qrpike/NodeJS-Git-Server

在照該網站上的步驟進行,到了要用 git 測試,就會出現

events.js:72
throw er; // Unhandled 'error' event
^
Error: spawn ENOENT
at errnoException (child_process.js:980:11)
at Process.ChildProcess._handle.onexit (child_process.js:771:34)

不曉得為什麼,已經在那裡留 issue 了。

但是在 ubuntu 就沒問題…。

後續:

後來不死心,用了最笨的方法,就是在 source code 裡到處加 console.log,看看程式怎麼跑。

後來知道了兩點,就把它修好了。

一、啟動新 server 需要指定 repoLocation。因為預設是 /tmp/repo,這目錄在 windows 下一定不存在。

二、git-server 其實是執行 git 指令,所以,一定要安裝 git,以 windows 來說,我安裝了 msysgit 的 Git-1.8.1.2-preview20130201.exe。

三、git-server 其實是執行 git 指令,又不會自帶路徑,所以要在環境變數 path,加入以下路徑:

C:\Program Files (x86)\Git\bin;C:\Program Files (x86)\Git\libexec\git-core

這樣,就可以啟動 git-server 了。

2013年5月27日 星期一

[nodejs] 安裝 node-gitteh 失敗過程

因為有人說,因為大家都是 *nix like,只有 windows 不是,所以有問題會很慢才解決,我當場就把作業系統給換成 ubuntu。

gitteh 是一個讓 nodejs 可以用程式的方式來執行 git 指令,因為我想要自動偵測新檔案出現,就自動 commit,所以腦筋就動到這東西來了。也有人說,只要會用 shell 指令,把 stdout 導出來,再做一些文字解析的工作,也就完成一樣的事,不過,就是怕改版文字會跑掉。所以,有人就寫了 libgit2 的 C 語言函式庫讓人使用,再由各語言呼叫 C 函式庫來滿足大家的需求,例如 nodejs、python。而 nodejs 的 bindings 就叫做 gitteh。

libgit2 的網站 http://libgit2.github.com/

gitteh 的網站 https://github.com/libgit2/node-gitteh

安裝 gitteh (在 ubuntu)

在 github 這裡,就只有說 npm  install gitteh 就好,看了就很高興。

BUT! 人生就怕這個字。

執行 npm install gitteh 遇到

hadoop@ubuntu:~/nodejs/myapp/src$ npm install gitteh
npm http GET https://registry.npmjs.org/gitteh
npm http 304 https://registry.npmjs.org/gitteh

> gitteh@0.1.0 preinstall /home/hadoop/nodejs/myapp/src/node_modules/gitteh
> node-waf configure --use-bundled-libgit2

sh: 1: node-waf: not found
npm ERR! weird error 127
npm ERR! not ok code 0


以為是少 node-waf,於是下指令 npm install node-waf

結果

hadoop@ubuntu:~/nodejs/myapp/src$ npm install node-waf
npm http GET https://registry.npmjs.org/node-waf
npm http 404 https://registry.npmjs.org/node-waf
npm ERR! 404 'node-waf' is not in the npm registry.
npm ERR! 404 You should bug the author to publish it
npm ERR! 404
npm ERR! 404 Maybe try 'npm search waf'
npm ERR! 404
npm ERR! 404 Note that you can also install from a
npm ERR! 404 tarball, folder, or http url, or git url.

npm ERR! System Linux 3.5.0-17-generic
npm ERR! command "/home/hadoop/.nvm/v0.10.7/bin/node" "/home/hadoop/.nvm/v0.10.7/bin/npm" "install" "node-waf"
npm ERR! cwd /home/hadoop/nodejs/myapp/src
npm ERR! node -v v0.10.7
npm ERR! npm -v 1.2.21
npm ERR! code E404
npm ERR!
npm ERR! Additional logging details can be found in:
npm ERR!     /home/hadoop/nodejs/myapp/src/npm-debug.log
npm ERR! not ok code 0

唉~~

試了 http://stackoverflow.com/questions/13784551/how-to-install-node-gitteh-module-from-npm-nodejs-0-8-x

npm install git://github.com/jmendeth/node-gitteh.git
失敗
再試 https://github.com/libgit2/node-gitteh/issues/21 還是失敗
我想試試先安裝 libgit2,npm install libgit2,結果找不到。
npm search libgit2 有找到一個 nodegit,就來試試,npm install nodegit。
跑了一大串之後得到


> nodegit@0.0.79 install /home/hadoop/nodejs/myapp/src/node_modules/nodegit
> node install.js


[nodegit] Downloading libgit2 dependency.
[nodegit] Building libgit2 dependency.
/usr/bin/env: cmake: No such file or directory
npm ERR! weird error 127
npm ERR! not ok code 0


於是 sudo apt-get install cmake 後,再一次,結果換 g++ 找不到。依稀記得有個 build-essential,就裝它吧。 sudo apt-get install build-essential 。再一次安裝 nodegit。好像成功了,雖然有 WARN


npm WARN package.json cli-table@0.2.0 No repository field.
nodegit@0.0.79 node_modules/nodegit
├── async@0.2.8
├── request@2.9.203
├── tar@0.1.17 (inherits@1.0.0, block-stream@0.0.6, fstream@0.1.22)
├── fs-extra@0.6.0 (jsonfile@0.0.1, ncp@0.4.2, mkdirp@0.3.5, rimraf@2.1.4)
└── node-gyp@0.8.5 (which@1.0.5, osenv@0.0.3, graceful-fs@1.2.1, rimraf@2.1.4, semver@1.1.4, mkdirp@0.3.5, glob@3.2.1, fstream@0.1.22, npmlog@0.0.2, nopt@2.1.1, minimatch@0.2.12)


又回到執行 npm install gitteh,登登!


> gitteh@0.1.0 preinstall /home/hadoop/nodejs/myapp/src/node_modules/gitteh
> node-waf configure --use-bundled-libgit2


sh: 1: node-waf: not found
npm ERR! weird error 127
npm ERR! not ok code 0


此路不通啊。


下載 git clone https://github.com/libgit2/node-gitteh.git 來安裝試試


hadoop@ubuntu:~/nodejs/myapp/src/node-gitteh$ node install.js


module.js:340
    throw err;
          ^
Error: Cannot find module 'async'
    at Function.Module._resolveFilename (module.js:338:15)
    at Function.Module._load (module.js:280:25)
    at Module.require (module.js:364:17)
    at require (module.js:380:17)
    at Object.<anonymous> (/home/hadoop/nodejs/myapp/src/node-gitteh/install.js:1:75)
    at Module._compile (module.js:456:26)
    at Object.Module._extensions..js (module.js:474:10)
    at Module.load (module.js:356:32)
    at Function.Module._load (module.js:312:12)
    at Function.Module.runMain (module.js:497:10)


看來是 async 找不到,就裝一下,


hadoop@ubuntu:~/nodejs/myapp/src/node-gitteh$ npm install async -g
npm http GET https://registry.npmjs.org/async
npm http 304 https://registry.npmjs.org/async
npm WARN package.json github-url-from-git@1.1.1 No repository field.
npm WARN package.json assert-plus@0.1.2 No repository field.
npm WARN package.json ctype@0.5.2 No repository field.
async@0.2.8 /home/hadoop/.nvm/v0.10.7/lib/node_modules/async


再試發現裝到 global 好像沒反應,就改裝在工作目錄。


hadoop@ubuntu:~/nodejs/myapp/src/node-gitteh$ node install.js


module.js:340
    throw err;
          ^
Error: Cannot find module 'async'
    at Function.Module._resolveFilename (module.js:338:15)
    at Function.Module._load (module.js:280:25)
    at Module.require (module.js:364:17)
    at require (module.js:380:17)
    at Object.<anonymous> (/home/hadoop/nodejs/myapp/src/node-gitteh/install.js:1:75)
    at Module._compile (module.js:456:26)
    at Object.Module._extensions..js (module.js:474:10)
    at Module.load (module.js:356:32)
    at Function.Module._load (module.js:312:12)
    at Function.Module.runMain (module.js:497:10)
hadoop@ubuntu:~/nodejs/myapp/src/node-gitteh$ npm install async
npm http GET https://registry.npmjs.org/async
npm http 304 https://registry.npmjs.org/async
async@0.2.8 node_modules/async


hadoop@ubuntu:~/nodejs/myapp/src/node-gitteh$


npm install async
npm http GET https://registry.npmjs.org/async
npm http 304 https://registry.npmjs.org/async
async@0.2.8 node_modules/asynchadoop@ubuntu:~/nodejs/myapp/src/node-gitteh$
hadoop@ubuntu:~/nodejs/myapp/src/node-gitteh$
hadoop@ubuntu:~/nodejs/myapp/src/node-gitteh$ node install.js
[gitteh] Downloading libgit2 dependency.
Submodule 'deps/libgit2' (git://github.com/libgit2/libgit2.git) registered for path 'deps/libgit2'
Cloning into 'deps/libgit2'...


中間省略


[gitteh] Building native module.
/bin/sh: 1: ./node_modules/.bin/node-gyp: not found


又少 node-gyp。再來 npm install node-gyp


hadoop@ubuntu:~/nodejs/myapp/src/node-gitteh$ npm install node-gyp
npm http GET https://registry.npmjs.org/node-gyp
npm http 304 https://registry.npmjs.org/node-gyp
npm http GET https://registry.npmjs.org/tar
npm http GET https://registry.npmjs.org/fstream
npm http GET https://registry.npmjs.org/graceful-fs
npm http GET https://registry.npmjs.org/minimatch
npm http GET https://registry.npmjs.org/mkdirp
npm http GET https://registry.npmjs.org/nopt
npm http GET https://registry.npmjs.org/npmlog
npm http GET https://registry.npmjs.org/osenv
npm http GET https://registry.npmjs.org/request
npm http GET https://registry.npmjs.org/rimraf
npm http GET https://registry.npmjs.org/semver
npm http GET https://registry.npmjs.org/which
npm http GET https://registry.npmjs.org/glob
npm http 304 https://registry.npmjs.org/graceful-fs
npm http 304 https://registry.npmjs.org/minimatch
npm http 304 https://registry.npmjs.org/fstream
npm http 304 https://registry.npmjs.org/nopt
npm http 304 https://registry.npmjs.org/npmlog
npm http 304 https://registry.npmjs.org/osenv
npm http 304 https://registry.npmjs.org/request
npm http 200 https://registry.npmjs.org/tar
npm http 304 https://registry.npmjs.org/rimraf
npm http 304 https://registry.npmjs.org/semver
npm http 304 https://registry.npmjs.org/which
npm http 304 https://registry.npmjs.org/glob
npm http 304 https://registry.npmjs.org/mkdirp
npm http GET https://registry.npmjs.org/ansi
npm http GET https://registry.npmjs.org/abbrev
npm http GET https://registry.npmjs.org/lru-cache
npm http GET https://registry.npmjs.org/sigmund
npm http GET https://registry.npmjs.org/inherits
npm http GET https://registry.npmjs.org/block-stream
npm http 304 https://registry.npmjs.org/abbrev
npm http 304 https://registry.npmjs.org/sigmund
npm http 304 https://registry.npmjs.org/lru-cache
npm http 304 https://registry.npmjs.org/ansi
npm http 304 https://registry.npmjs.org/inherits
npm http 304 https://registry.npmjs.org/block-stream
npm http 304 https://registry.npmjs.org/inherits
node-gyp@0.8.5 node_modules/node-gyp
├── which@1.0.5
├── osenv@0.0.3
├── graceful-fs@1.2.1
├── rimraf@2.1.4
├── semver@1.1.4
├── mkdirp@0.3.5
├── request@2.9.203
├── nopt@2.1.1 (abbrev@1.0.4)
├── fstream@0.1.22 (inherits@1.0.0)
├── minimatch@0.2.12 (sigmund@1.0.0, lru-cache@2.3.0)
├── npmlog@0.0.2 (ansi@0.1.2)
├── tar@0.1.17 (inherits@1.0.0, block-stream@0.0.6)
└── glob@3.2.1 (inherits@1.0.0)


再試 node install.js


/home/hadoop/.node-gyp/0.10.7/deps/uv/include/uv.h:1411:15: error:   initializing argument 4 of ‘int uv_queue_work(uv_loop_t*, uv_work_t*, uv_work_cb, uv_after_work_cb)’ [-fpermissive]
make: *** [Debug/obj.target/gitteh/src/repository.o] Error 1
make: Leaving directory `/home/hadoop/nodejs/myapp/src/node-gitteh/build'
gyp ERR! build error
gyp ERR! stack Error: `make` failed with exit code: 2
gyp ERR! stack     at ChildProcess.onExit (/home/hadoop/nodejs/myapp/src/node-gitteh/node_modules/node-gyp/lib/build.js:256:23)
gyp ERR! stack     at ChildProcess.EventEmitter.emit (events.js:98:17)
gyp ERR! stack     at Process.ChildProcess._handle.onexit (child_process.js:789:12)
gyp ERR! System Linux 3.5.0-17-generic
gyp ERR! command "node" "/home/hadoop/nodejs/myapp/src/node-gitteh/node_modules/.bin/node-gyp" "build"
gyp ERR! cwd /home/hadoop/nodejs/myapp/src/node-gitteh
gyp ERR! node -v v0.10.7
gyp ERR! node-gyp -v v0.8.5
gyp ERR! not ok


還是失敗。等等,會不會忘了 preinstall?結果沒用…。


於是我就放棄了,試試看 http://www.pygit2.org/

2013年5月21日 星期二

[nodejs]安裝在 ubuntu

使用 nvm 來安裝 node.js 據說是現在推薦的方法。

nvm 是一個善心人士提供的管理工具,用 shell 指令寫的,可以幫忙安裝 node.js。

打開 terminal!

首先,先安裝 git,才能把 nvm 下載回來。一般 ubuntu 可能沒有安裝 git。

sudo apt-get install git

然後,下載 nvm 到使用者目錄去

git clone git://github.com/creationix/nvm.git ~/.nvm

接下來,把 shell 指令,附到 shell 的設定裡

echo ". ~/.nvm/nvm.sh" >> ~/.bashrc

然後重開 terminal 讓指令生效。

先測試一下,現在有什麼版本可以安裝

nvm ls-remote

因為,nvm 使用 curl 抓取資料與檔案,所以,如果沒有安裝 curl,使用下列指令安裝 curl

sudo apt-get install curl

從 nvm ls-remote 指令,可以看到很多版本,現在最新的是 v0.11.2 但是官網頁面上寫 v0.10.7,就安裝 v0.10.7 以策安全。

nvm install v0.10.7

最後,設定 node 預設版本為 v0.10.7

nvm alias default v0.10.7

這樣就安裝完畢了!

之後就可以在 terminal 底下,使用 node 指令。例如,看一下 node 的版本

node -v

如果發生找不到 node 的話,就再用 nvm use v0.10.7 這個指令。