https://blog.risingstack.com/getting-started-with-nodejs-and-mqtt/
Node.js 加 MQTT 入門
這篇貼文由 Charlie Key 提供,他是 Structure 的 CEO 與 Co-Founder。Structure 是一個 IoT 的平台,讓你能輕鬆建立相連的經驗與解決方案。Charlie 已經用 Node.js 於工作幾年,現在用它來為 IoT 的世界充能。
Javascript 的世界持續地開發新彊界,像 Node.js 的技術可讓伺服端快速擴展,而現在達到 IoT 的世界。Node.js 現在可在許多嵌入式裝置內,像是 Intel Edison。與嵌入式裝置的溝通一向都可行的,但使用 Node.js 與 MQTT 這類協定讓溝通前所未有的簡單。
在這貼文,我們會看一下如何利用兩個技術(Node.js 與 MQTT)來傳送訊息,建立一個簡易的車庫開門應用程式。這只是此類通訊的其中的一個可能的應用。
MQTT 本身是個非常簡單的 publish / subscribe (出版/訂閱)協定。它讓你在一個主題上送訊息(你可以想像那些是頻道),經由一個中央管理的 message broker。整個協定故意非常輕量。這會讓它能輕易地在嵌入式裝置上執行。幾乎所有的微處理器都有函式庫可用讓它能收送 MQTT 的訊息。以下可以看到 MQTT 溝通的基本概念。
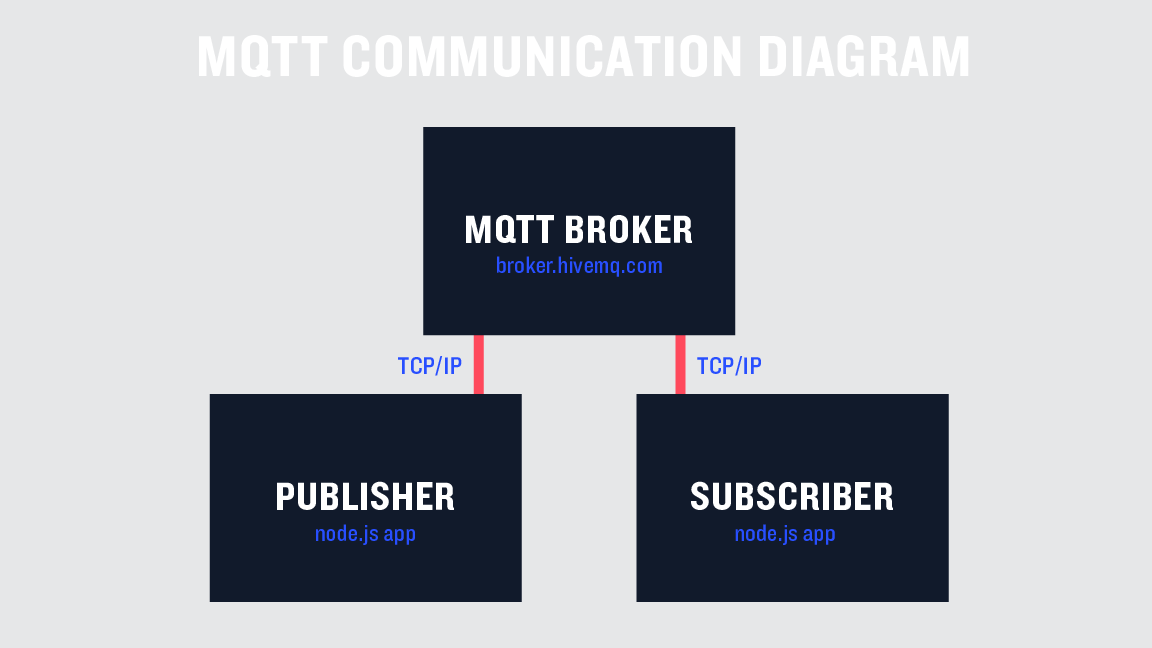
現在,想像一下我們要打造一個遠端控制的車庫開門系統,使用 MQTT。第一件事我們需要計畫車庫門與遠端遙控器要傳送什麼訊息。為了要讓這範例簡單,我們只打算能夠開門與關門就好。真實的架構圖會長成這樣:

門會有幾個狀態,已開、已關、開門中、關門中。真的門也許會有其他狀態,如 暫停。但我們今天暫不考慮。
我們的應用程式會分開兩個檔案,一個是給車庫用另一個給控制器用。我會在每個程式的上頭標名檔名。首先,我們會需要用 npm 安裝 mqtt 函式庫,然後設定我們要用的 broker。現在有很多開放的 broker 可用於測試,我會使用 broker.hivemq.com。再次強調,這只是測試用,不要在正式產品還用這個。以下是兩個檔案一開始都要的程式碼:
// contoller.js and garage.js
const mqtt = require('mqtt')
const client = mqtt.connect('mqtt://broker.hivemq.com')
接下來,我們要加一些程式碼來連上 broker。一定連上,我們會建立一個主題(頻道),這在車庫門連上時的溝通用的。在門這邊,是 publish(出版)訊息到這個主題,而控制器這邊則是subscribe(訂閱)。同樣,在這個時間點,我們會加一個區域變數,追蹤車庫門現在的狀態。你會發現我們的主題加了前綴 “garage/”,這是為了組織目的的簡化,你也可以隨自己喜歡來命名。
// garage.js
const mqtt = require('mqtt')
const client = mqtt.connect('mqtt://broker.hivemq.com')

/**
* The state of the garage, defaults to closed
* Possible states : closed, opening, open, closing
*/

var state = 'closed'

client.on('connect', () => {
  // Inform controllers that garage is connected
  client.publish('garage/connected', 'true')
})
在控制器端,我們不只是要訂閱這主題,我們也需要加上訊息接聽者,對訊息出版時採取動作。一但訊息收到,我們會使用一個變數,檢查變數的值且追蹤是否門還連在系統上。
// controller.js
const mqtt = require('mqtt')
const client = mqtt.connect('mqtt://broker.hivemq.com')

var garageState = ''
var connected = false

client.on('connect', () => {
  client.subscribe('garage/connected')
})

client.on('message', (topic, message) => {
  if(topic === 'garage/connected') {
    connected = (message.toString() === 'true');
  }
})
目前為止,門與控制器只知道,門是否連在系統上,我們還不能採取什麼動作。為了要讓控憲器知道門發生什麼事,我們再加上一個函式,送出現在門的狀態,函式長這樣:
// added to end of garage.js
function sendStateUpdate () {
  console.log('sending state %s', state)
  client.publish('garage/state', state)
}
要使用這個函式,我們會加在車庫連上的呼叫裡:
// updated garage.js connect
client.on('connect', () => {
  // Inform controllers that garage is connected
  client.publish('garage/connected', 'true')
  sendStateUpdate()
})
現在車庫門可以更新,告訴每個人它現在的狀態。現在控制器需要更新自己的門狀態的變數。然而在這個時間點,先更新訊息處理函式,對應不同的主題呼叫不同的函式。這會增加一點程式的結構性。整個更新完如下:
// updated controller.js
const mqtt = require('mqtt')
const client = mqtt.connect('mqtt://broker.hivemq.com')

var garageState = ''
var connected = false

client.on('connect', () => {
  client.subscribe('garage/connected')
  client.subscribe('garage/state')
})

client.on('message', (topic, message) => {
  switch (topic) {
    case 'garage/connected':
      return handleGarageConnected(message)
    case 'garage/state':
      return handleGarageState(message)
  }
  console.log('No handler for topic %s', topic)
})

function handleGarageConnected (message) {
  console.log('garage connected status %s', message)
  connected = (message.toString() === 'true')
}

function handleGarageState (message) {
  garageState = message
  console.log('garage state update to %s', message)
}
在這裡,我們的控制器可以跟上車庫門的狀態與連線狀態。現在可以加一些功能來控制我們的門。第一件事是讓車庫開始接聽一些訊息,告訴它開或關。
// updated garage.js connect call
client.on('connect', () => {
  client.subscribe('garage/open')
  client.subscribe('garage/close')

  // Inform controllers that garage is connected
  client.publish('garage/connected', 'true')
  sendStateUpdate()
})
我們現在需要在車庫門這裡加個訊息接聽者:
// added to garage.js
client.on('message', (topic, message) => {
  console.log('received message %s %s', topic, message)
})
在控制器這裡,我們也會加上傳送開門或關門訊息的能力。這有兩個簡單的函式。在一個真實的應用程式中,這會由外部輸入來呼叫(像是 web 應用程式,手機 app…等)。在這個範例中,我們會用個計時器來呼叫,只是測試這個系統而已。新增的程式碼如下:
// added to controller.js
function openGarageDoor () {
  // can only open door if we're connected to mqtt and door isn't already open
  if (connected && garageState !== 'open') {
    // Ask the door to open
    client.publish('garage/open', 'true')
  }
}

function closeGarageDoor () {
  // can only close door if we're connected to mqtt and door isn't already closed
  if (connected && garageState !== 'closed') {
    // Ask the door to close
    client.publish('garage/close', 'true')
  }
}

//--- For Demo Purposes Only ----//

// simulate opening garage door
setTimeout(() => {
  console.log('open door')
  openGarageDoor()
}, 5000)

// simulate closing garage door
setTimeout(() => {
  console.log('close door')
  closeGarageDoor()
}, 20000)
以上的程式碼包含開與關的功能。它們確認車庫已經連上系統而且不在已要求的狀態中。我們的控制器最後版本的程式碼如下:
// controller.js
const mqtt = require('mqtt')
const client = mqtt.connect('mqtt://broker.hivemq.com')

var garageState = ''
var connected = false

client.on('connect', () => {
  client.subscribe('garage/connected')
  client.subscribe('garage/state')
})

client.on('message', (topic, message) => {
  switch (topic) {
    case 'garage/connected':
      return handleGarageConnected(message)
    case 'garage/state':
      return handleGarageState(message)
  }
  console.log('No handler for topic %s', topic)
})

function handleGarageConnected (message) {
  console.log('garage connected status %s', message)
  connected = (message.toString() === 'true')
}

function handleGarageState (message) {
  garageState = message
  console.log('garage state update to %s', message)
}

function openGarageDoor () {
  // can only open door if we're connected to mqtt and door isn't already open
  if (connected && garageState !== 'open') {
    // Ask the door to open
    client.publish('garage/open', 'true')
  }
}

function closeGarageDoor () {
  // can only close door if we're connected to mqtt and door isn't already closed
  if (connected && garageState !== 'closed') {
    // Ask the door to close
    client.publish('garage/close', 'true')
  }
}

// --- For Demo Purposes Only ----//

// simulate opening garage door
setTimeout(() => {
  console.log('open door')
  openGarageDoor()
}, 5000)

// simulate closing garage door
setTimeout(() => {
  console.log('close door')
  closeGarageDoor()
}, 20000)
現在,車庫門必須對應這些訊息做反應。再一次,我們使用 switch 引導不同的主題。一但訊息被收到,門會試著處理它且確認它能到那狀態才動作。然後它會進入轉移狀態(開門中、關門中),送出更新訊息,最後到達持續狀態(已開、已關)。為了測試的目的,最後一個部份是用計時器來完成。在真實情況中,系統應該等待硬體訊號通知它已完成。
// updated garage.js message handler
client.on('message', (topic, message) => {
  console.log('received message %s %s', topic, message)
  switch (topic) {
    case 'garage/open':
      return handleOpenRequest(message)
    case 'garage/close':
      return handleCloseRequest(message)
  }
})
開門與關門的處理函式可以加到檔案的最後。
// added to garage.js
function handleOpenRequest (message) {
  if (state !== 'open' && state !== 'opening') {
    console.log('opening garage door')
    state = 'opening'
    sendStateUpdate()

    // simulate door open after 5 seconds (would be listening to hardware)
    setTimeout(() => {
      state = 'open'
      sendStateUpdate()
    }, 5000)
  }
}

function handleCloseRequest (message) {
  if (state !== 'closed' && state !== 'closing') {
    state = 'closing'
    sendStateUpdate()

    // simulate door closed after 5 seconds (would be listening to hardware)
    setTimeout(() => {
      state = 'closed'
      sendStateUpdate()
    }, 5000)
  }
}
有了這些函式,我們現在有個完整功能的車庫系統。為了測試你可以開啟控制器程式然後再開車庫門程式。控制器會在開啟後 5 秒送開門指令,20 秒送關門指令。
最後我要建議的事是讓我們的車庫門更新自己的連線狀態,當我們的程式因為任何原因被關掉的時候。這個離開的乾淨程式碼是依照 stackoverflow answer 建議,然後改用 mqtt 訊息傳送。這可在放在車庫檔案的最後。所有的東西組合起來就得到最後的車庫檔案。
// garage.js
const mqtt = require('mqtt')
const client = mqtt.connect('mqtt://broker.hivemq.com')

/**
 * The state of the garage, defaults to closed
 * Possible states : closed, opening, open, closing
 */
var state = 'closed'

client.on('connect', () => {
  client.subscribe('garage/open')
  client.subscribe('garage/close')

  // Inform controllers that garage is connected
  client.publish('garage/connected', 'true')
  sendStateUpdate()
})

client.on('message', (topic, message) => {
  console.log('received message %s %s', topic, message)
  switch (topic) {
    case 'garage/open':
      return handleOpenRequest(message)
    case 'garage/close':
      return handleCloseRequest(message)
  }
})

function sendStateUpdate () {
  console.log('sending state %s', state)
  client.publish('garage/state', state)
}

function handleOpenRequest (message) {
  if (state !== 'open' && state !== 'opening') {
    console.log('opening garage door')
    state = 'opening'
    sendStateUpdate()

    // simulate door open after 5 seconds (would be listening to hardware)
    setTimeout(() => {
      state = 'open'
      sendStateUpdate()
    }, 5000)
  }
}

function handleCloseRequest (message) {
  if (state !== 'closed' && state !== 'closing') {
    state = 'closing'
    sendStateUpdate()

    // simulate door closed after 5 seconds (would be listening to hardware)
    setTimeout(() => {
      state = 'closed'
      sendStateUpdate()
    }, 5000)
  }
}

/**
 * Want to notify controller that garage is disconnected before shutting down
 */
function handleAppExit (options, err) {
  if (err) {
    console.log(err.stack)
  }

  if (options.cleanup) {
    client.publish('garage/connected', 'false')
  }

  if (options.exit) {
    process.exit()
  }
}

/**
 * Handle the different ways an application can shutdown
 */
process.on('exit', handleAppExit.bind(null, {
  cleanup: true
}))
process.on('SIGINT', handleAppExit.bind(null, {
  exit: true
}))
process.on('uncaughtException', handleAppExit.bind(null, {
  exit: true
}))
這了那些,我們完成了我們的車庫門控制器。我希望你能挑戰下一級。一些修改與一個 Intel Edison 會讓你建立一個完整的遠端車庫開門系統。此範例完整的原始碼也會放在 Github。
這只是一個開始。還有一些 MQTT 的新選項與能力,包含使用 SSL、使用者/密碼 認證來增加安全性。
如果你喜歡這篇貼文且想知道 Node.js 能到什麼程度,這有個超讚會議會來到:Node Community Convention。將會有許多偉大的演講,主題包含 IoT、系統放大……等等。
作者
Gabor Nagy
在 Marketing 是個全端。在 web 開發正在從零到英雄的路上。